> ## Documentation Index
> Fetch the complete documentation index at: https://docs.trueparser.com/llms.txt
> Use this file to discover all available pages before exploring further.
# App Setup and Config
> Create your tenant application, understand required fields, manage credentials, and configure custom storage.
This page guides you through creating and configuring a **Tenant Application** within the TrueParser Developer Dashboard.
**A Tenant Application is strictly required to access the TrueParser Parsing API.** It represents an isolated machine identity (client) under your organization. Once set up and assigned a subscription plan, its client credentials are used to obtain secure, 15-minute access tokens to communicate with the high-performance TrueParser Parsing API.
***
## The Tenant Application Lifecycle
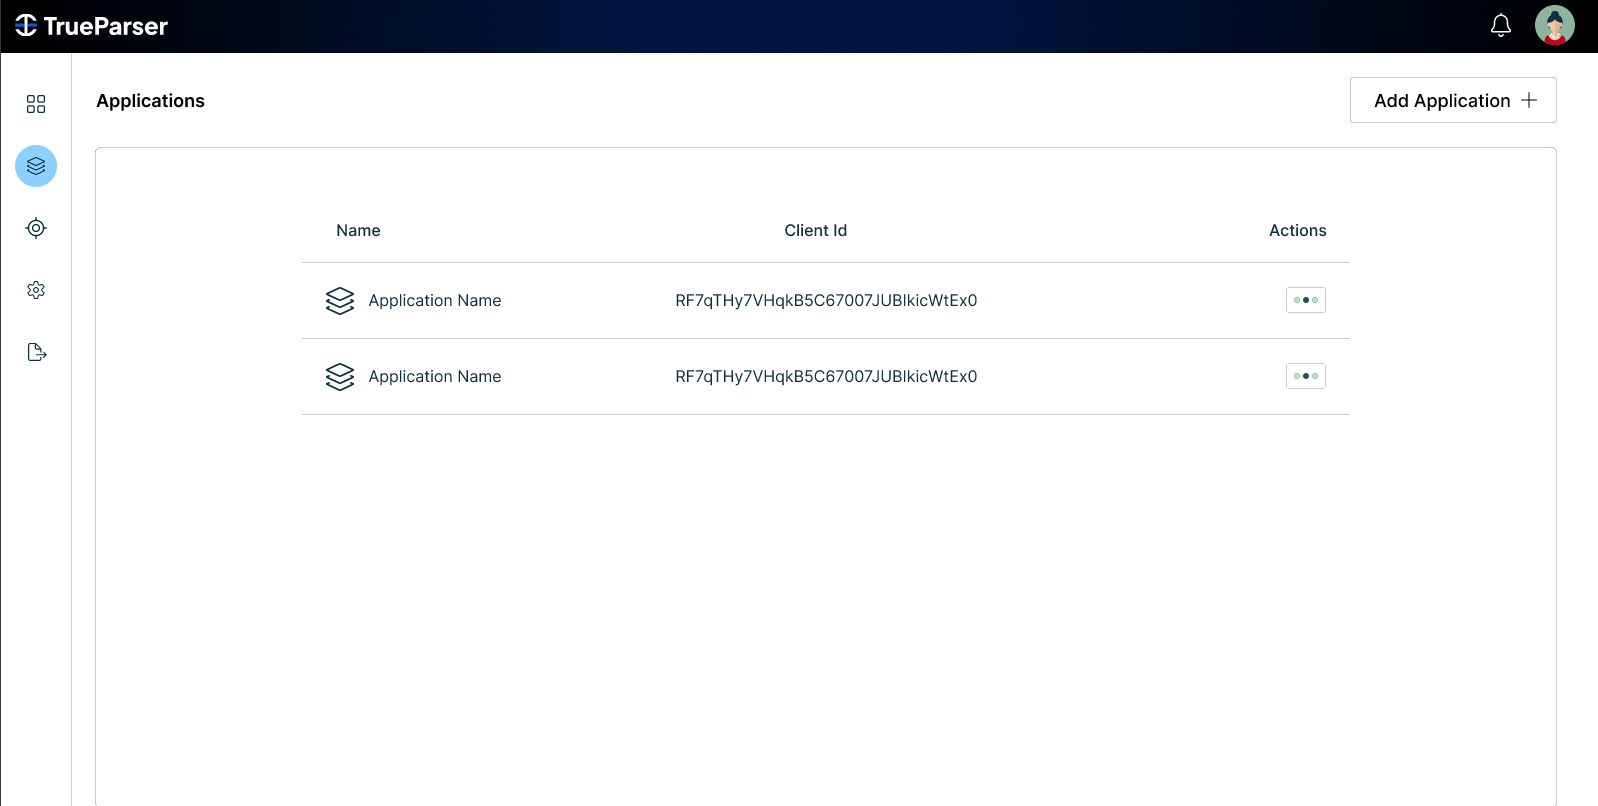
To get started, navigate to the **Applications** screen from the dashboard's sidebar menu. Here, you can view your active applications, their client IDs, and add new machine clients.
 Configuring a new application follows a four-step lifecycle:
```mermaid theme={null}
graph LR
Create[1. Create App] --> Configure[2. General Settings]
Configure --> Plan[3. Assign Plan]
Plan --> Storage[4. Configure Storage]
```
### Application Quotas & Limits
To ensure optimal platform performance, application quotas are enforced at the tenant level:
* **Default Application Cap**: By default, each organization is limited to a **maximum of 3 active applications** within their tenant.
* **Free Plan Limitation**: Out of your permitted applications, **only 1 application** can be assigned to the **Free Tier** plan (\$0/Month). Any additional applications must be subscribed to paid tiers to process documents.
* **Limit Increase Requests**: If your team requires more machine clients, you can open a support ticket from the dashboard to request a quota increase (subject to evaluation and approval).
* **Enterprise Scaling**: If your infrastructure requires **more than 10 active applications**, please contact our sales team directly to transition to an **Enterprise Tier** account with custom limits and dedicated resources.
***
## 1. Create a Tenant Application
Click the **Add Application +** button in the top right corner of the Applications list to open the creation modal.
Configuring a new application follows a four-step lifecycle:
```mermaid theme={null}
graph LR
Create[1. Create App] --> Configure[2. General Settings]
Configure --> Plan[3. Assign Plan]
Plan --> Storage[4. Configure Storage]
```
### Application Quotas & Limits
To ensure optimal platform performance, application quotas are enforced at the tenant level:
* **Default Application Cap**: By default, each organization is limited to a **maximum of 3 active applications** within their tenant.
* **Free Plan Limitation**: Out of your permitted applications, **only 1 application** can be assigned to the **Free Tier** plan (\$0/Month). Any additional applications must be subscribed to paid tiers to process documents.
* **Limit Increase Requests**: If your team requires more machine clients, you can open a support ticket from the dashboard to request a quota increase (subject to evaluation and approval).
* **Enterprise Scaling**: If your infrastructure requires **more than 10 active applications**, please contact our sales team directly to transition to an **Enterprise Tier** account with custom limits and dedicated resources.
***
## 1. Create a Tenant Application
Click the **Add Application +** button in the top right corner of the Applications list to open the creation modal.
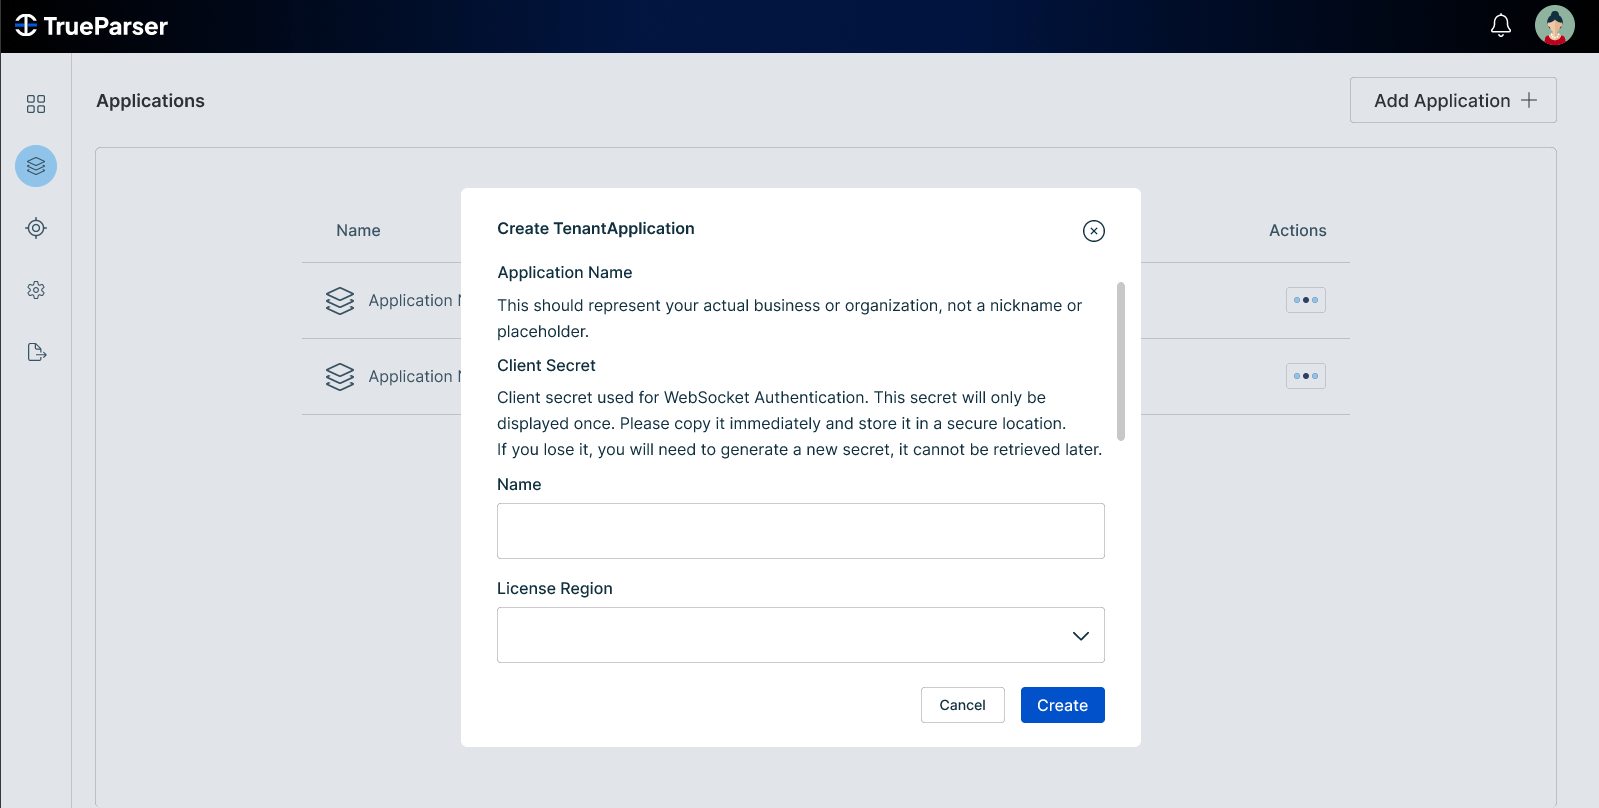 Initially, the modal displays the primary creation fields. Provide the following core parameters:
* **Application Name**: Enter a formal display name for the application (under the `Name` field).
Your application's display name represents your business or organization in formal verification contexts. It should be descriptive (e.g., `Acme Document Parser Production`) rather than a nickname or placeholder.
* **License Region**: Select the geographical region for your application data from the dropdown.
License regions are predefined with stable location codes linked to regional Turso database shards. Ensure you choose the region aligned with your data-locality requirements. You can view all available regions and their details in the **Locations** tab (see the [License Regions](/dashboard/license-regions) guide).
### Reveal Advanced Settings (Scroll Down)
If you **scroll down within the creation modal**, several advanced options will be revealed:
* **Status (Enabled / Disabled)**: Choose whether your new application is initialized in an active state (`Enabled`) or is temporarily turned off (`Disabled`) upon creation.
* **Allowed Domains (1, 2, and 3)**: You can pre-configure your allowed domains directly inside the creation modal. These are the client application domains permitted to access the YJS/parsing backend (e.g., for browser-based CORS authentication).
Click **Create** to submit the form.
### Capture Your Credentials Safely
Upon successful creation, the dashboard will display a success toast presenting the one-time generated plaintext **Client Secret**.
Initially, the modal displays the primary creation fields. Provide the following core parameters:
* **Application Name**: Enter a formal display name for the application (under the `Name` field).
Your application's display name represents your business or organization in formal verification contexts. It should be descriptive (e.g., `Acme Document Parser Production`) rather than a nickname or placeholder.
* **License Region**: Select the geographical region for your application data from the dropdown.
License regions are predefined with stable location codes linked to regional Turso database shards. Ensure you choose the region aligned with your data-locality requirements. You can view all available regions and their details in the **Locations** tab (see the [License Regions](/dashboard/license-regions) guide).
### Reveal Advanced Settings (Scroll Down)
If you **scroll down within the creation modal**, several advanced options will be revealed:
* **Status (Enabled / Disabled)**: Choose whether your new application is initialized in an active state (`Enabled`) or is temporarily turned off (`Disabled`) upon creation.
* **Allowed Domains (1, 2, and 3)**: You can pre-configure your allowed domains directly inside the creation modal. These are the client application domains permitted to access the YJS/parsing backend (e.g., for browser-based CORS authentication).
Click **Create** to submit the form.
### Capture Your Credentials Safely
Upon successful creation, the dashboard will display a success toast presenting the one-time generated plaintext **Client Secret**.
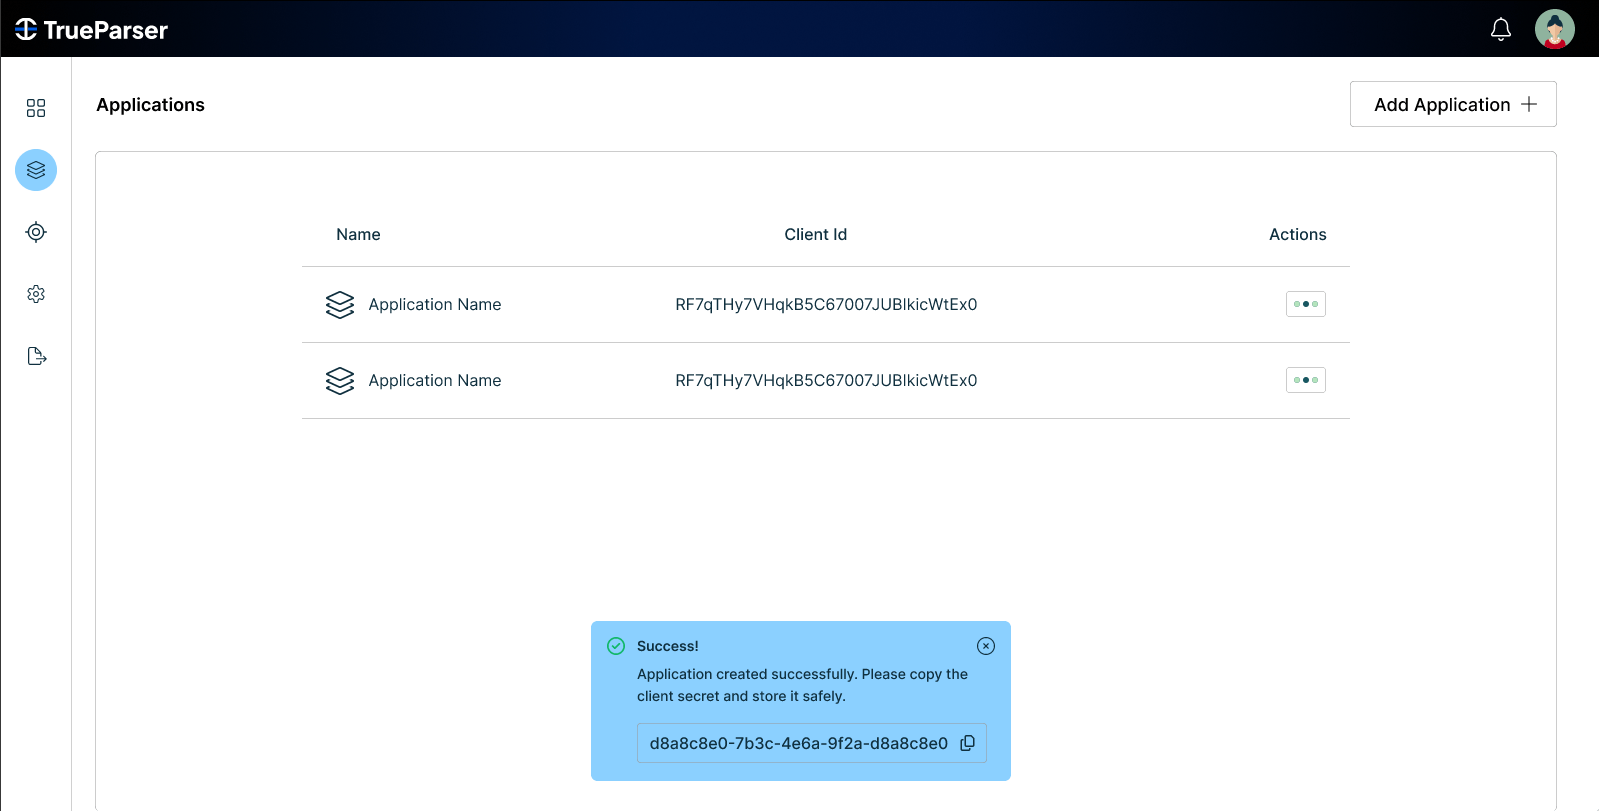 **Copy the Client Secret immediately and store it in a secure location (such as a corporate password manager).**
For security reasons, this plaintext secret is only shown once and cannot be retrieved later. If lost, you will have to regenerate the secret, which immediately invalidates the old credential.
***
## 2. General Settings (General Settings Tab)
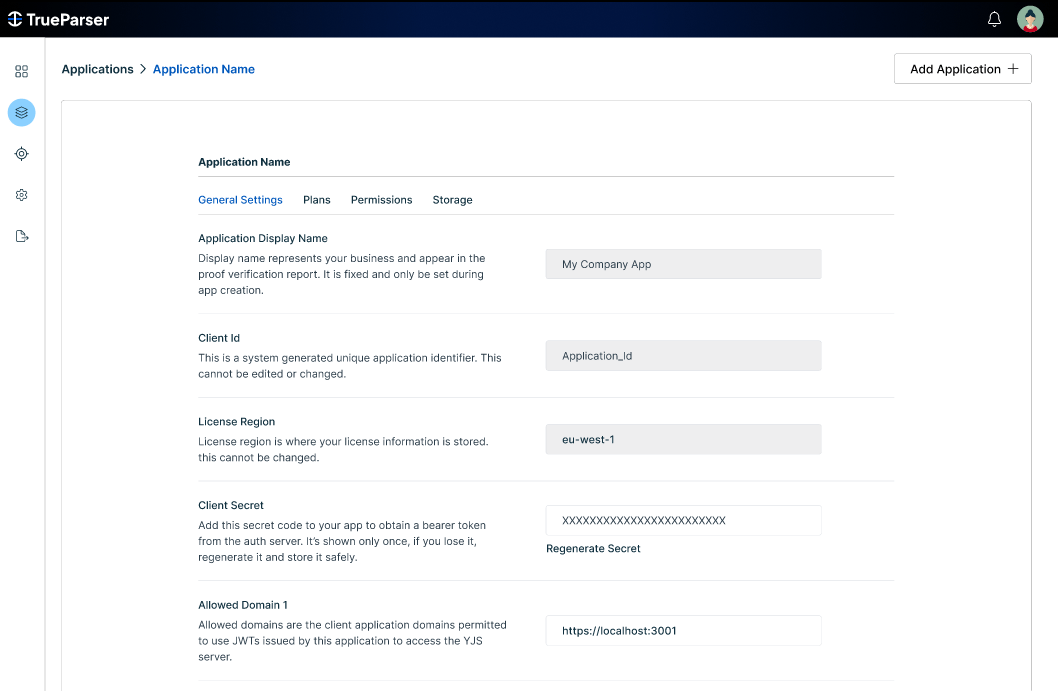
After creating your application, click on its name in the Applications list to enter the detailed configuration view. The **General Settings** tab displays the core properties of your machine identity:
**Copy the Client Secret immediately and store it in a secure location (such as a corporate password manager).**
For security reasons, this plaintext secret is only shown once and cannot be retrieved later. If lost, you will have to regenerate the secret, which immediately invalidates the old credential.
***
## 2. General Settings (General Settings Tab)
After creating your application, click on its name in the Applications list to enter the detailed configuration view. The **General Settings** tab displays the core properties of your machine identity:
 ### Read-Only Identifiers
To prevent configuration drift and preserve transactional integrity, key parameters are locked upon creation:
* **Application Display Name**: Represents your business in proof verification reports (fixed).
* **Client ID**: The system-generated unique identifier used as the OAuth2 client identity (fixed).
* **License Region**: The geographical boundary where your parsing shard and data reside (fixed).
### Secret Management
* **Client Secret**: Masked by default.
* **Regenerate Secret**: If your secret is exposed or lost, click **Regenerate Secret**. This immediately invalidates the previous secret across the platform. Update all backend servers using the old credential with the new plaintext secret instantly to prevent service interruption.
### Allowed Domains (CORS Constraints)
You can optionally save up to **three allowed domains** on the application.
* **Purpose**: These domains are injected into Cross-Origin Resource Sharing (CORS) headers allowed to use JSON Web Tokens (JWTs) issued by this application.
* **Use Case**: Required if you are connecting to the TrueParser Parsing API directly from a browser-based, client-side application (e.g., an in-browser SPA).
* **Domain Validation Rules**:
* `http://` and `https://` protocols are automatically stripped.
* Trailing slashes `/` are removed.
* Wildcards are rejected (e.g., `*.domain.com` is invalid).
* `localhost` is allowed (e.g., `localhost:3000`).
***
## 3. Review application permissions
Open the **Permissions** area in your application details to verify what this app can access.
### Read-Only Identifiers
To prevent configuration drift and preserve transactional integrity, key parameters are locked upon creation:
* **Application Display Name**: Represents your business in proof verification reports (fixed).
* **Client ID**: The system-generated unique identifier used as the OAuth2 client identity (fixed).
* **License Region**: The geographical boundary where your parsing shard and data reside (fixed).
### Secret Management
* **Client Secret**: Masked by default.
* **Regenerate Secret**: If your secret is exposed or lost, click **Regenerate Secret**. This immediately invalidates the previous secret across the platform. Update all backend servers using the old credential with the new plaintext secret instantly to prevent service interruption.
### Allowed Domains (CORS Constraints)
You can optionally save up to **three allowed domains** on the application.
* **Purpose**: These domains are injected into Cross-Origin Resource Sharing (CORS) headers allowed to use JSON Web Tokens (JWTs) issued by this application.
* **Use Case**: Required if you are connecting to the TrueParser Parsing API directly from a browser-based, client-side application (e.g., an in-browser SPA).
* **Domain Validation Rules**:
* `http://` and `https://` protocols are automatically stripped.
* Trailing slashes `/` are removed.
* Wildcards are rejected (e.g., `*.domain.com` is invalid).
* `localhost` is allowed (e.g., `localhost:3000`).
***
## 3. Review application permissions
Open the **Permissions** area in your application details to verify what this app can access.
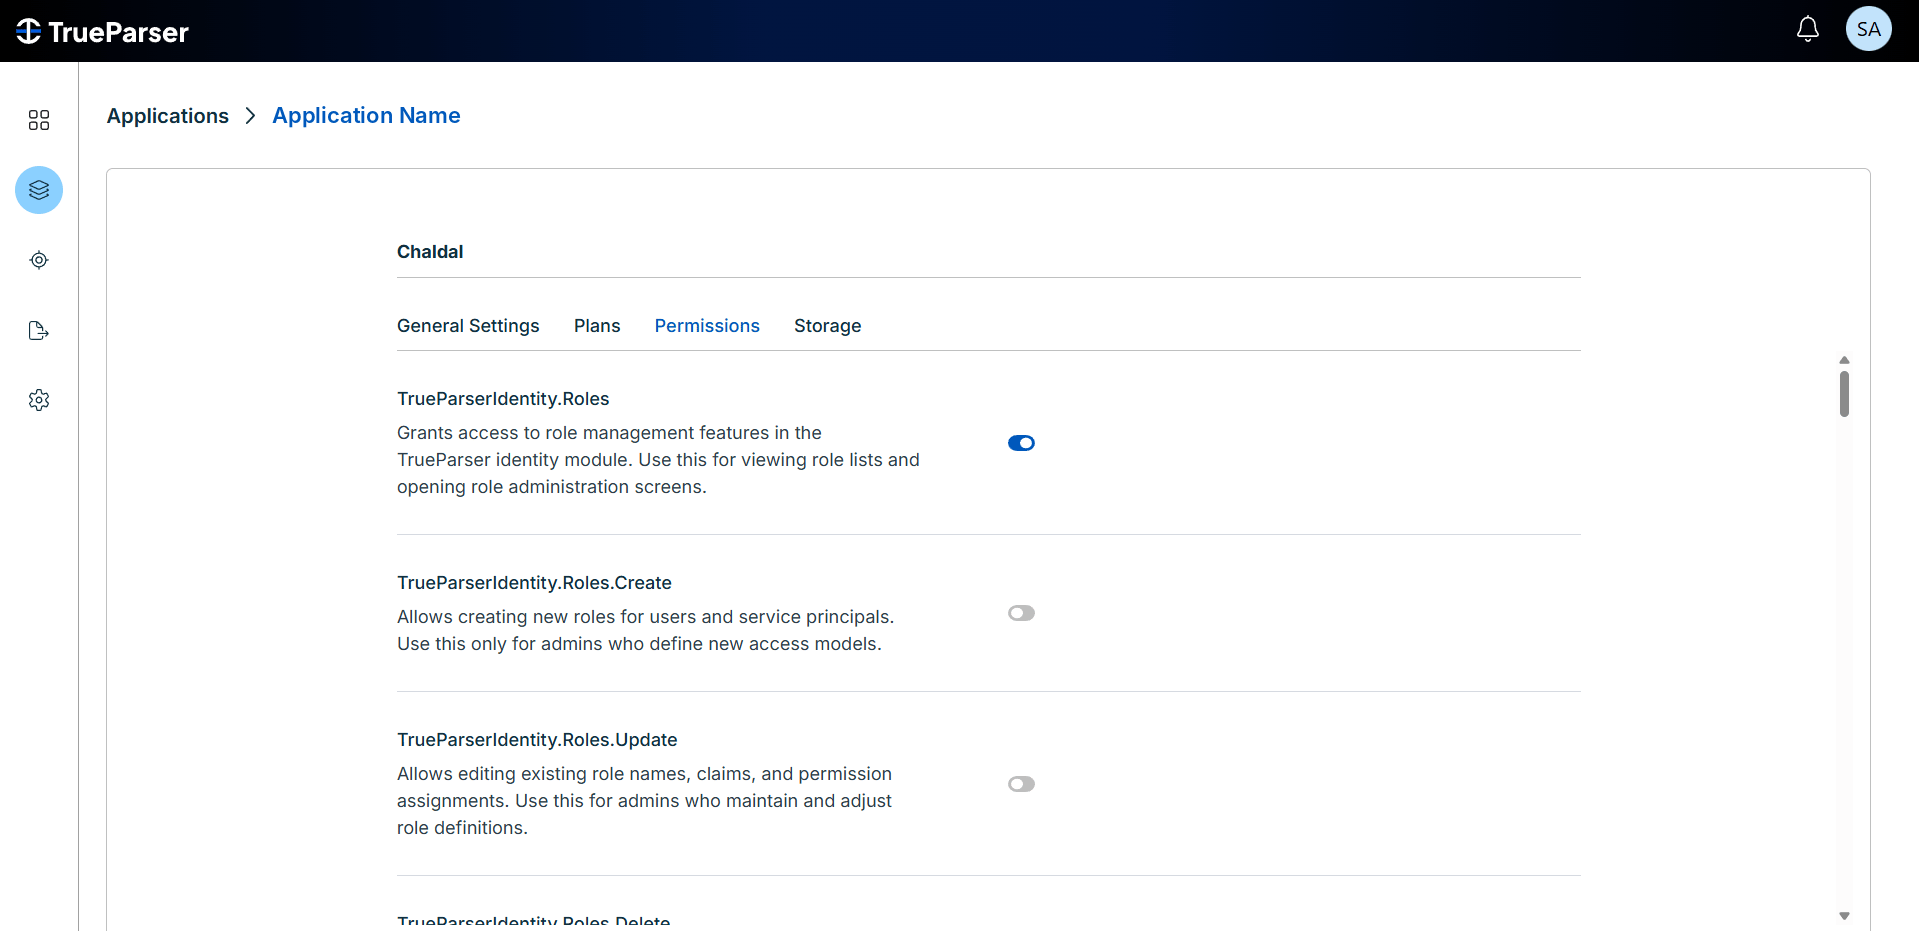 Use this section to confirm permissions match your intended environment before moving to billing and production usage.
***
## 4. Assign a Subscription Plan (Plans Tab)
**Plan assignment is strictly mandatory to process files.**
While your application can technically request tokens without a plan, those tokens will lack the required **plan entitlements and limits** claims. **The TrueParser Parsing API will strictly reject all document-parsing requests** unless an active subscription plan is assigned to the calling application.
Select the **Plans** tab to subscribe your application to a parsing tier:
Use this section to confirm permissions match your intended environment before moving to billing and production usage.
***
## 4. Assign a Subscription Plan (Plans Tab)
**Plan assignment is strictly mandatory to process files.**
While your application can technically request tokens without a plan, those tokens will lack the required **plan entitlements and limits** claims. **The TrueParser Parsing API will strictly reject all document-parsing requests** unless an active subscription plan is assigned to the calling application.
Select the **Plans** tab to subscribe your application to a parsing tier:
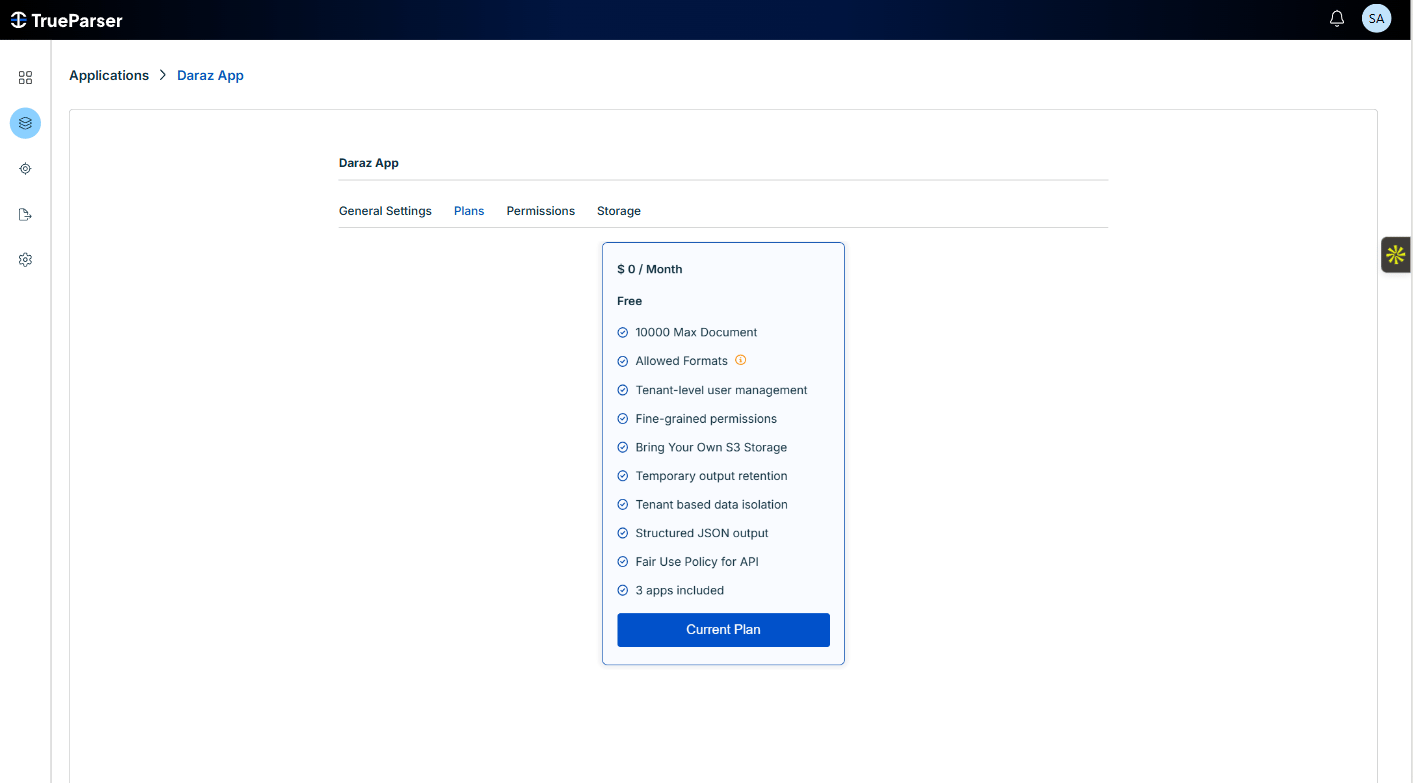 ### The Activation Paths
* **Free Tier (\$0/Month)**:
If you choose the Free tier, the dashboard **skips the payment gateway entirely**. The plan is instantly activated for your application, and you can immediately begin parsing documents.
* **Paid Tiers**:
Selecting a premium tier triggers a secure checkout flow. You will be prompted to add a credit card and complete the billing checkout before the plan entitlements are applied to your client credentials.
If an application is assigned a retired plan, token issuance is blocked. Ensure your applications are migrated to active, supported tiers.
***
## 5. Configure S3 Storage (Storage Tab)
**Bringing your own S3-compatible storage is completely optional.**
If left unconfigured, the platform automatically uses its own secure, high-availability managed global storage to host your parsed files. Configure this tab only if your organization requires direct data custody or compliance constraints.
Navigate to the **Storage** tab to configure custom storage:
### The Activation Paths
* **Free Tier (\$0/Month)**:
If you choose the Free tier, the dashboard **skips the payment gateway entirely**. The plan is instantly activated for your application, and you can immediately begin parsing documents.
* **Paid Tiers**:
Selecting a premium tier triggers a secure checkout flow. You will be prompted to add a credit card and complete the billing checkout before the plan entitlements are applied to your client credentials.
If an application is assigned a retired plan, token issuance is blocked. Ensure your applications are migrated to active, supported tiers.
***
## 5. Configure S3 Storage (Storage Tab)
**Bringing your own S3-compatible storage is completely optional.**
If left unconfigured, the platform automatically uses its own secure, high-availability managed global storage to host your parsed files. Configure this tab only if your organization requires direct data custody or compliance constraints.
Navigate to the **Storage** tab to configure custom storage:
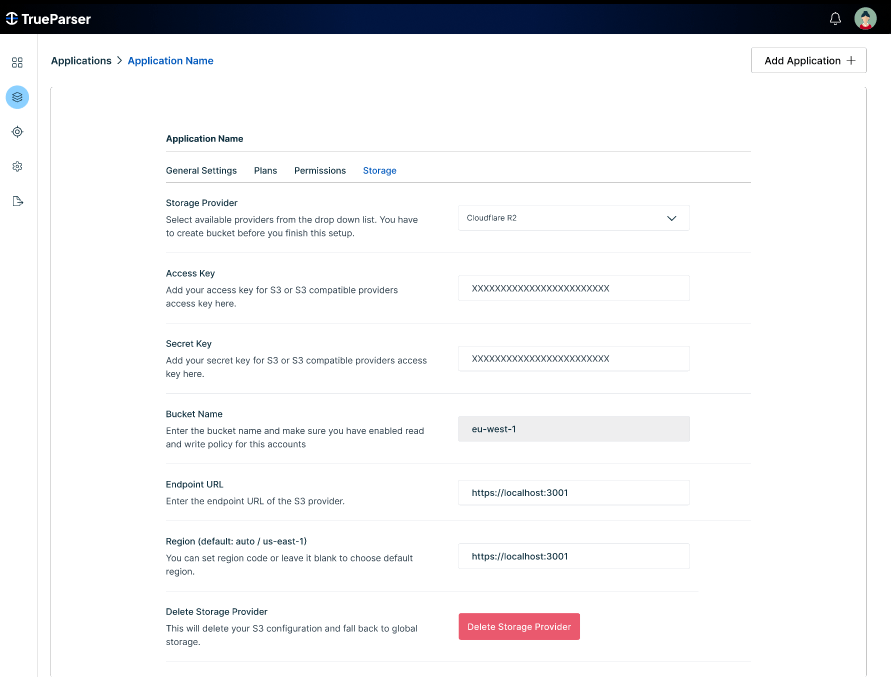 **Prerequisite**: You must create the bucket in your S3 provider's console and enable appropriate **Read and Write policies** for the provided access credentials before configuring this tab.
Provide the following parameters:
* **Storage Provider**: Choose your provider from the dropdown. Supported platforms include:
* *Cloudflare R2, AWS S3, Tigris, MinIO, and Backblaze B2*.
* **Access Key**: The S3 credential access key ID.
* **Secret Key**: The S3 credential secret access key.
* **Bucket Name**: The exact name of your target S3 bucket.
* **Endpoint URL**: The service endpoint URL of your S3 provider.
* **Region**: The region code (defaults to auto or `us-east-1` if left blank).
### Reverting to Managed Storage
If you wish to stop hosting files in your private bucket and return to platform-managed secure storage, click the **Delete Storage Provider** button. This will wipe your custom S3 credentials and safely fall back to the platform's global storage.
***
## Next Steps
Now that your application is created, activated with a plan, and optionally configured with custom storage, you are ready to authenticate and process documents:
* **Token Authentication**: Learn how to use your Client ID and Client Secret to obtain a 15-minute bearer token in the [Authentication Guide](/dashboard/authentication).
* **Interactive Testing**: Set up the pre-built parsing demo UI using your credentials in the [Demo UI Tutorial](/dashboard/demo-ui).
* **Plan Quotas**: Track your monthly ingestion and document usage in the [Billing & Quotas](/dashboard/billing) reference.
**Prerequisite**: You must create the bucket in your S3 provider's console and enable appropriate **Read and Write policies** for the provided access credentials before configuring this tab.
Provide the following parameters:
* **Storage Provider**: Choose your provider from the dropdown. Supported platforms include:
* *Cloudflare R2, AWS S3, Tigris, MinIO, and Backblaze B2*.
* **Access Key**: The S3 credential access key ID.
* **Secret Key**: The S3 credential secret access key.
* **Bucket Name**: The exact name of your target S3 bucket.
* **Endpoint URL**: The service endpoint URL of your S3 provider.
* **Region**: The region code (defaults to auto or `us-east-1` if left blank).
### Reverting to Managed Storage
If you wish to stop hosting files in your private bucket and return to platform-managed secure storage, click the **Delete Storage Provider** button. This will wipe your custom S3 credentials and safely fall back to the platform's global storage.
***
## Next Steps
Now that your application is created, activated with a plan, and optionally configured with custom storage, you are ready to authenticate and process documents:
* **Token Authentication**: Learn how to use your Client ID and Client Secret to obtain a 15-minute bearer token in the [Authentication Guide](/dashboard/authentication).
* **Interactive Testing**: Set up the pre-built parsing demo UI using your credentials in the [Demo UI Tutorial](/dashboard/demo-ui).
* **Plan Quotas**: Track your monthly ingestion and document usage in the [Billing & Quotas](/dashboard/billing) reference.